「初期化」の版間の差分
M (ページ 基本セッティング・ガイド を 基本セットアップ・ガイド へ移動: 英語版の直訳に変更) |
M (英語版へのリンクを追加) |
||
| 361 行 | 361 行 | ||
<!-- links to other languages --> | <!-- links to other languages --> | ||
[[de:Grundlegende Setup Anleitung]] | [[de:Grundlegende Setup Anleitung]] | ||
| + | [[en:Setup Guide]] | ||
<br><br>[[基本セッティング・ガイド(旧)]] | <br><br>[[基本セッティング・ガイド(旧)]] | ||
2008年5月4日 (日) 05:03の版
By Robert "Moby" Bjorkman
ほとんどのひとの問題は、自分のドライビングスタイルに合うように現在のセットアップを調整することです。 あなたが速いと感じるセットを持っていても、それをより良くチューンする方法を知らないだけかも知れません。 セットアップのイントロダクションへようこそ。 このガイドは、あなたがセットアップの組み立て方とその発展方法を理解する手助けとなります。
基本
このガイド中のほとんどの情報を理解するために、 あなたはまずいくつかの基本情報(ものごとがどの様に働くか)を知らなければなりません。 セクション1.1-0~1.5.1は、すべてのレーシング ゲームに一般的です。 セクション2.1.0~2.3.4はLive for Speed に固有です。
基礎レーシング物理への手引き
非常に簡単に言えば、これは"荷重がどこへ行くか?"のゲームです。 高速の車にブレーキをかけているとき、全荷重は車の前へ移動します。 加速するとき、全荷重は後へ移動します。 左へ曲がるとき荷重は右へ行き、そして反対も。 車は、あなたが行きたい方向に応じて動き回ろうとする質量(mass)を持っています。 私たちがやりたいことは、この動作を制御することです。 そのための多くのツールがあります。
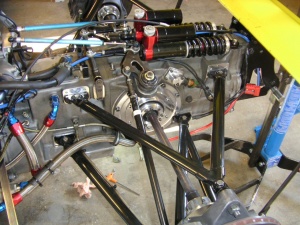
ばね
車の質量(mass)は、移動するときにエネルギーを生じます。 車のばね(Springs)はこのエネルギーを吸収します。 車台(chassis)で生じたエネルギーは、ばねを通じてタイヤに影響を及ぼします。 これは、ばねが硬い場合には、車台からのエネルギーのほとんどがばねによって吸収されることを意味します。 そうすると車台の動きが速くなりますが、一方タイヤの移動量(amount of travel)が減少します。 そのためでこぼこのトラックを走行しているときには、タイヤは単にこぶを飛び越えてしまい、 地面と接し続けることができません。
ダンパー
ダンパーは、車の質量(mass)を制御するためのさらなる調整を可能にします。ダンパーの助けによって、どの程度速くあるいは遅く、圧縮・伸長するかを制御することができます。これは、コーナーの異なるポイントを制御することができることを意味します。理解を助けるよう、ひとつのコーナーを示しましょう。
入口:あなたはブレーキをかけ、シフトダウンを開始します。
荷重:荷重は車の前方に移動します。フロントダンパーは圧縮、リアダンパーは伸長します。
頂点(コーナー中部):あなたはコーナーに入り、ブレーキペダルを放します。
荷重:このとき荷重は車の側面へ移動しています。コーナーに対し外側のダンパーは圧縮され、内側のダンパーは伸長します。
出口:あなたはコーナー出口で加速を始めます。
荷重:荷重は車の後方へ移動します。リアダンパーは圧縮し、フロントダンパーは伸長します。
The conclusion is this: 結論はこうなります:
| フロント | リア | |
|---|---|---|
| 入口: | 縮み側ダンパー | 伸び側ダンパー |
| 出口: | 伸び側ダンパー | 縮み側ダンパー |
ショックアブソーバをよりやわらかくするほど、より速く荷重移動します。より硬くすれば、より遅く荷重移動します。もし車が旋回に入ろうとするときアンダーステアであるなら、フロント側により多くの荷重が必要ということです。フロント側をやわらかくしてより沈み込むようにする、あるいはリアのリバウンドダンパーをゆるくしてリア側がより持ち上がるようにすることで、よりフロント側に荷重移動するようにすれば、特性を変えることができます。もし車がコーナー出口でオーバーステアであるなら、リアの縮み側ダンパーを硬くして後ろへの荷重移動を少なくする、あるいはフロントのリバウンド ダンパーを変更しフロント側があまり浮き上がらないようにして荷重移動を少なくすることができます。
ロールバー
コーナーを走り抜けるときには、車の質量(mass)が側面に移動します。アンチロールバーの働きはこうです。左右のサスペンションに接続し、質量の移動量と歩調をあわせてサスペンションの位置関係(geometry)を保ち続けます。そのため車が横に傾いているときでさえ、タイヤは最大の接触を保てるのです。アンチロールバーは、過剰に硬いばねに頼ることなくロール抵抗を加算します。適切に選択されたアンチロールバーは、コーナーでのボディのロールを減らし、コーナリングでのトラクションを向上し、一方で乗り心地の硬さを増加せず、タイヤ接地をよく維持してタイヤの有効性を減らしません。
このツールをどのように使いましょうか。簡単に言えば、これは左右の質量の移動量を制御します。硬いアンチロールバーのセッティングは安定性を増しますが、代わりに利用可能ななんらかのトラクションを失います。アンチロールバーは車全体のバランスを調整する非常によいツールです。コーナーバランスの個々の部分を変更したいならダンパーセッティングを用いるべきですが、全体のバランスを変更する必要がある場合はアンチロールバーを調整します。
車高
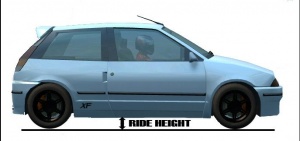
このセッティングは地表と車との間隔を調整します。より低いセッティングは車の重心をより低くし、全体的なハンドリングの助けとなります。しかしながら、低すぎる車を走らせていると、特に縁石やこぶ上で車を地面やサスペンション下限に接触させてしまいます。これは速度や制御を失う結果となります。
ステアリング
Maximum lock: ハンドルをいっぱいに切ったときに前輪の角度がどれだけ変わるか。
Caster: ステアリング時のタイヤの角度を制御します。簡単に言えば、大きなキャスターは高速時により安定し、小さなキャスターは低速時により安定します。さらに、ステアリング時の前輪のキャンバーも変わります。
Parallel steer: ステアリング角度の増加につれフロント両輪の切れ角が変化する割合です。高い値では、ステアリング時にトーインになり、低い値では、ステアリング時にトーアウトになります。
車輪
車輪は車を地面に接続するものです。ここにはいくつかのオプションがあります。
トー(Toe)
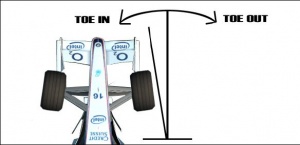
Toe: 車輪がそちらへ進むよう初期設定された角度です。トーインは安定性を高めます。トーアウトは回頭性を高めますが、車をよりナーバスにします。
キャンバー
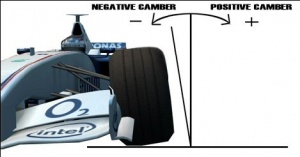
キャンバーを変えることもできます。キャンバーが大きいほど、車は直線では速くなります。タイヤの接地面が少ないためです。しかし大きなキャンバーはブレーキング性能や加速性能を減らしてしまいます。普通のトラック(オーバル以外)でレースを行うすべてのレーシングカーは、ネガティブキャンバーになっています。そうするとコーナーにおいて外輪の接地面積が最適になります。 オーバルトラックには一方向の旋回しかなく、かつ非常に大きなバンクがあり、外輪には多量のネガティブキャンバーと、内輪にはポジティブキャンバーが必要とされます。そうすると内側のタイヤもまた接地面積が最大になります。
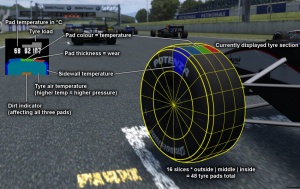
キャンバー補正のためのタイヤ温度の読み方
もし温度がこのようになっていたら、キャンバーのつけすぎ:
| Outside | Middle | Inside |
|---|---|---|
| 70 | 81 | 110 |
もし温度がこのようになっていたら、キャンバーが不足:
| Outside | Middle | Inside |
|---|---|---|
| 90 | 80 | 55 |
空気圧
タイヤの空気圧を調整するオプションもあります。空気圧が低いほどグリップは高くなり、一方空気圧が高いほど直線で速くなります。空気圧が高いほど、精密なハンドリングになります。
ギアボックス
ギアボックスはRPM(回転数)と、エンジンから車輪に伝わるトルクの量を制御します。ギアボックスは異なるギアレシオセッティングを用いて最適化され、そのためエンジンは常に適正な回転数で動作します。
ギア
ここでは、ギアボックスの個々の構成品を設定できます。ファイナルドライブ; より大きな加速性またはより高いトップスピードのどちらかを得るように、ギア設定全体を制御できます。個々のギアもまた、特定のコーナーに適合するように変更することができます。
デフ(Differential)
デフは、説明するにはかなり複雑な装置です。基本的には、ギアボックスから各車輪への力の量を制御します。この因子(factor:計算の要素)を変更すると、どの車輪がよりスリップしているかに応じて、各車輪が同じ量または異なる量(の駆動力)を得ます。デフのタイプは下記:
Locked diff: リアの両輪の間の因子は定数です(訳注:「リアの」は正しくは「各駆動車輪の」)。 両方の車輪は同じ距離を移動します。 これはしかし、旋回時に車輪が同じ距離を移動しないときには、抵抗力を生じます。 Locked diffを持つ車はまっすぐに前進したがるので、ドラッグレースには完璧です。
Open diff: 各駆動車輪の移動距離が異なることを許します。 これはしかし、ある車輪がグリップを失うと、その車輪はパワーが解放されるまでスピンし続けることを意味します。 レースには適しません。
Clutch pack LSD: 前述の二つの間のどこかに位置します。 各車輪の移動距離が異なることを許容しつつ、一定の制限を適用します。 よくあるのは、惰性(coast)/パワー(power)を調整できるものです。 つまり、スロットルオフ(惰性)時と、スロットルオン(パワー)時で、どの程度ロックさせたいかを制御する、ということです。
Viscous LSD: これはClutch pack LSDに似ていますが、速度に反応します。 もしある車輪がもう一方の車輪より速くスピンしていたら、もう一方の車輪に力を伝えようとします。 さらに、先述の車輪が速くスピンすればするほど、もう一方の車輪により多くの力が伝わります。
実際のレース環境においては、ほとんどClutch pack LSDのみが使用されています。
ブレーキ
車を止めるのはブレーキです。ブレーキディスクに加える圧力の量を、異なるレベルに設定することができます。これはほとんど試行錯誤で行われます。コーナーを旋回する直前で最大の力を加えたときに、ロックし始める車輪が欲しいはずです。(訳注:自信なし。When you apply max force you want the wheels only to start locking right before you turn into the corner.)
異なる状況に適合するよう、ブレーキバランスを変えることもできます。ブレーキバランスは、フロントブレーキとリアブレーキに伝わる圧力の量を調整します。最適な値は50対50でしょうが、荷重が車のフロントに移動しており、リア側はより少ない質量であるため、後輪はロックしやすくなります。したがってよい値は、およそフロント60%、リア40%のあたりです。ブレーキング中にリア側がロックするなら、ブレーキバランスをフロント側に多くする必要があります。フロントとリアが同時にロックするなら、それが最適なセッティングです。
エアロダイナミクス
車周辺の空気の流れはウィング、車台の形、およびグランドエフェクトの助けで調整できます。ウィングは、車をトラックに留まらせるネガティブリフト(ダウンフォース)を生みます。これで、コーナーをより速く回れる代わりにトップスピードが落ちます。グランドエフェクトは、車を地面に吸い付かせるために車の下に真空を生みます。これは、いわゆるベンチュリ管のトンネルによって作られます。グランドエフェクトは車高に非常に依存し、車が地面に近いほど、より効果が得られます。(車高に依存するグランドエフェクトはLFSでは未実装です。)
ウィング設定は頻繁に計算されます。車のバランスを同一に保つには、リアウィングを1ノッチ調整したらリアウィングを2ノッチ調整します。
Development process from scratch
Now we know the basics of the car. We must now learn how to use this information effectively. Most race engineers in the real world have their own model of a test day or test session. I will teach you the basics of mine. It may not suit everyone, but it will give you a platform to work from and may help you to develop something of your own. The biggest difference is that in sim-racing you have no budget to keep to. I will however run this as a real world example but adopt it to the "Live For Speed" platform. This part will assume you can drive two laps without crashing.
Track day
Out on the track for the first day. You must have certain elements under control. The setup must be looked at roughly. If you are totally blank on information for the vehicle, just set everything with suspension, steering, aerodynamics and differential at medium. Is it a fast track or slow track? That decides what to start with in the gearbox. Amount of laps you think you will run and then fill the gas tank accordingly.
ステップ
- Prepare. When out on the first lap I always turn on the tire temperature screen(F9). Here you can see the different temps of the tires. Blue means they are cold. Now always allow the first lap to heat up the tires, any feedback you get from cold tires is useless. Green means they are coming into optimum range. Red means they are getting too hot and black means you have a puncture.
- Test properly. Now you should be on your second lap. Tires should show green. After the first lap you should have a rough feel for the car. Testing properly means you run at race tempo. Going slower will not result in correct tire data or balance, going faster means you will end up in a wall. During the second lap you make mental notes of each corner. Noting balance, brakes and revs thru the corners.
- Data handling. Coming in on third lap you have two choices.
- Go on to drive until you have mental notes of all corners.
- Stop, check temperatures and make notes of them. Correct camber according to (1.2.3). A constant eye on tires and temp. are a must during all testing, you should always make sure you have optimum camber. Doing a qualification setup can mean running more camber than usual.
解析
When you’re in the garage you think back on your mental notes. What was the biggest problem? Adjust only one thing at a time, mixing things will often result in over doing it and not knowing what did what.
Go thru steps 1,2,3 again. Change one thing and repeat. Now what to tune first. I have here a list of what I focus on. I usually go thru the list pretty quickly the first time, to get a good base to work from. Keep in my mind that I’m constantly changing the camber during these changes.
- Brakes
- Springs
- Anti-roll bars
- Aerodynamics/Gearbox
- Dampers
- Steering, caster, parallel steer
- Tire pressure
Most changes will result in effecting other things on your setup, keep in mind you may have to go thru the list a couple of times. Aerodynamics has such large influence on top speed and cornering speed that you should try and adjust the gearbox to suit the different aero settings you are testing. Making sets are time consuming. In the end you will have a set that perfectly suits you which is the aim of this guide.
Tuning existing setup
Different controls
What parameters is special for each control and controller setting? Isolating these will help you to tune it to your wheel.
These are found under steering in the garage. The first one is maximum lock. This value will control how many degrees the wheels will turn until it’s fully locked. If you feel a set is nervous and someone else feels its very stable then this setting should be reduced. If you feel it’s not turning at all then you should increase this setting. I usually play a lot with this setting. For example if the setup creator has a MOMO wheel I know that maximum lock should be reduced 1-3 notches to suit my Act-labs wheel.
Then we have the other setting its called controller wheel turns x degrees. How it works is better explained elsewhere but the important thing is that you have a value on top of the slider. That is the recommended value for you to use. However most people don’t. Including me.(This is connected largely to the setting wheels turns in options menu.) I feel much more precise if I set the value to around 30-35% of the recommended value in controller wheel turns in steering menu. However this might not have the desired effect on all wheels. You should test out a value for both these settings to suit you. This might be required for all sets you get but after awhile you will know pretty quickly what do which each set.
After adapting the set to your wheel you will be able to analyse better how the set works and what good points there is on this particular set.
解析
Read (2.1.3). What I would like to add is, if you’re running a good set you only need small changes. By small I mean changing 2-4 notches in either direction. The tricky part is when you have a setup that you like, but you’re just not fast enough. What do we change then?
There is no secret that most people download setups or ask others to share with them. However this is no certainty for success. Driving styles, different controls and control setup will upset the balance or change different aspects of the set. So what makes a world record set for one guy is not a world record set for someone who doesn’t use the same control options.
The most information when receiving a set is when you compare it with your old set. Analyse why it works. Is there some special parameter that is very different from your old set? The best sets I have made is often a rear end combined with a front end from some other set, and then I combine these two with a gearbox from a third set and so on. Take all the best pieces from each set and put it into one. But first we must understand some of the basics of the new set.
Faster vs Safer
Going faster means you are pushing towards what physics allow. When you get closer to that limit it will mean losing some of your control. When you are the fastest in the world it means you’re the one that is closest to the limit of the car without losing control. At one point in your set development you will get to the point when you cannot make the car go faster in a straight line because then you lose in the corners. When you have a decent balance in the car you try and see if you can go further without losing control. This is done in small steps.
- Reduce downforce, 2 notches at front and 1 at rear. Still good, then move on
- Higher tire pressure, when its too high you will lose traction.
- Optimize gearing
- Reduce toe
Repeat the cycle until you feel you can go no further without losing the car. Still no world record?
Improve yourself
A large part to success is preparation and practice. Practicing at making setups is only one part of the big puzzle that makes world records. There are shortcuts though. Running with other skilled racers and watching replays of world records. Analyzing where you’re slower and what you’re doing wrong are great things that are guaranteed to make you go “oh, could I go that fast there?”.
Endurance setup
In these days long distance races are popular. It’s a mix between having a good set and good consistent driver. Making tires last is a complex thing and it’s different depending on combo. Full tank balance is different to empty tank balance and so on.
解析
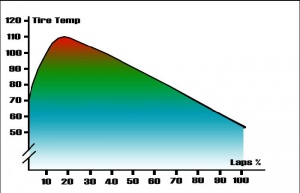
The first thing you have to do is a full stint with the current setup. Full tank and push it to the max until the tires gets so hot that you cannot drive it anymore or you get a flat tire. The data should help you come to terms with the balance during the stint. A perfect balance during the entire stint will be almost impossible. At the start of the stint you should have a little understeer and as the fuel disappears it should more and more go over to neutral and towards the end of the stint even oversteer. The critical point is when the tires has reached its highest stint temperature, after that the tires should very slowly go down in temperature. After the tire peak has occurred you have your most valuable laps. Here you should be able to use the car to its maximum without any difficulties.
タイヤ
The tire in LFS has a cycle. It starts cold and starts to heat up and will reach a peak temperature, and as it starts to wear down the tire will release some of the heat and start to go down in temperature. This cool off effect is greater then in real life and on some tracks you must balance the peak and the eventual puncture temperature. Having higher airpressure in the tires will make the tire peak temperature lower. Having perfect camber and minimizing slides is also things that make the tire last longer and also bring down the peak temperature slightly.
If we go more into detail, a softer spring is also something that extends tire life. Although this effect seems very small in LFS. Toe in/out also adds to roll resistance. More tire pressure will give you a more precise handling and since it will deform less and reduce flex in the tire wall it does not use as much energy as low inflated tire. Meaning it will roll easier but on the other side have less traction and grip as a low inflated tire.
Finals words
ドライバーとして、首尾一貫していることはとても重要です。というのも、あなたがラインやドライビングスタイルを変更したら、セットアップは毎回異なる反応を示すからです。テストする際は、お決まりの溝をたどるよう挑戦し、そこに定住してください。より精度の高いテストデータをもたらすでしょう。
クイックリファレンス
あなたの車がいずれかの様子で振る舞うなら、以下を試してください。私はあなたの現在のセットアップを知りませんから、これらは一般的な提案であることを忘れないでください。
| コーナー入口でアンダーステアになる | コーナー出口でアンダーステアになる |
|---|---|
| フロントの縮み側ダンパーをやわらかくする | フロントの縮み側ダンパーを硬くする |
| リアの伸び側ダンパーをやわらかくする | リアの伸び側ダンパーを硬くする |
| キャスターを増やす | キャスターを減らす |
| フロントのアンチロールをやわらかくする | フロントのアンチロールを硬くする |
| リアのアンチロールを硬くする | リアのアンチロールをやわらかくする |
| コーナー中部でアンダーステアになる | コーナー中部でオーバーステアになる |
|---|---|
| フロントのロールバーをやわらかくする | フロントのロールバーを硬くする |
| リアのロールバーを硬くする | リアのロールバーをやわらかくする |
| キャンバーを多くする | キャンバーを少なくする |
| フロントのダウンフォースを増やす | フロントのダウンフォースを減らす |
| リアのダウンフォースを減らす | リアのダウンフォースを増やす |
| コーナー出口でアンダーステアになる | コーナー出口でオーバーステアになる |
|---|---|
| フロントの伸び側ダンパーを硬くする | フロントの伸び側ダンパーをやわらかくする |
| リアの縮み側ダンパーを硬くする | リアの縮み側ダンパーをやわらかくする |
| キャスターを減らす | キャスターを増やす |
| フロントのアンチロールをやわらかくする | フロントのアンチロールを硬くする |
| リアのアンチロールを硬くする | リアのアンチロールをやわらかくする |
|
基本セットアップガイド | 応用セットアップガイド | テクニカルリファレンス | スキン作成 チュートリアル | オートクロスエディタ | ムービー作成 チュートリアル | スクリプト作成 | Host チュートリアル | LFS プログラミング | ファイルフォーマット | |||
